Inky Magic: when glue won’t do
- 31st July 2025
There are lots of different jobs in archaeology so for a day in archaeology, we thought we would introduce you to a talented member of our post-excavation team. Laura, our senior archaeological illustrator has recently been working on a Bronze Age beaker from Milestone Ground, Broadway. It’s so delicate it can’t be physically reconstructed but through her meticulous drawings, its form and design are being brought back to life. Laura explains her process:
Reconstructing a Bronze Age beaker
This beaker was in large pieces, but although we recognised that it could be reconstructed, it was in such a fragile state that it was cracking and breaking into fragments when handled. Physically reconstructing it wasn’t a possibility, but with careful handling, illustration could offer a method of bringing the sherds together.
The diameter of rims or bases is the starting point for reconstruction drawings of ceramic vessels, and the rim was easily identified with its ribbed- pattern and flared shape. This large sherd had the rim, two bands of decoration and the central shoulder angle of the vessel where just a hint of the top of the next band of decoration was visible.
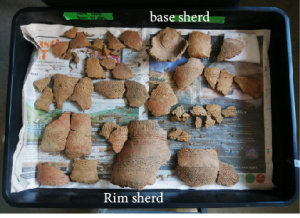
It’s usually possible to get a rim diameter from rim sherds this large, but with beakers, the rims can be very irregular, and it was difficult to obtain a definite measurement on this one. This makes drawing awkward, but we did have a base sherd with a very flat round base which gave us a good diameter as a starting point for the drawing.
The decoration on the outside is a series of comb-impressed patterns making a geometric design of several horizontal bands. Our team examined the sherds, matching the patterns on the outside of the pot and deciding which sherds related to each other. This is a task similar to doing a jigsaw. The best way is to have a busy day where lots of people can come by and share their thoughts. We needed to know how many bands of pattern there were and where each band of decoration should be placed.
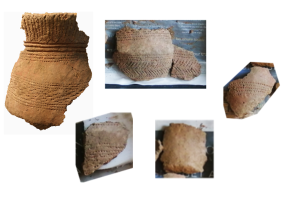
The sherds used to draw the patterns
The largest sherd gave us a clear picture of the rim and upper band, as far as the central angle but the sherds for the lower half were more fragmentary. Eventually we identified four different bands of pattern, some sherds giving a portion of decoration with the plain pot between the bands allowing us to place them in relation to each other. I selected four larger sherds to use to draw the shape of the beaker and drew the profile of each separately. The base first, as I was confident in the size of the diameter and the flat base was easy to put in position. Using a customised set square I was able to outline the shape of the pot, and with callipers measured the thickness of the vessel body. I drew the large rim sherd next. This was hard to position correctly, so I approximated its angle just to get the shape and body measurements.
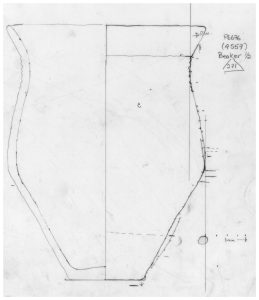
The shape of the pot
The pattern was drawn by placing the sherd in position beneath a plate of glass. I looked through the glass with the aid of a set square and sighting guide to draw the detail of the pattern onto a piece of acetate placed on the glass, then traced the pattern detail onto the profile drawing.
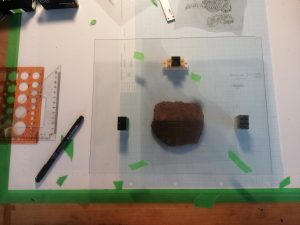
Ready to start drawing the patterns
I repeated this for each chosen sherd so that I had profile and pattern for all parts of the pot.
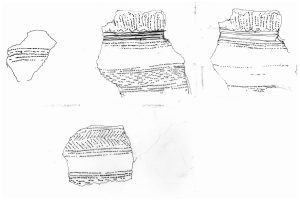
Each section drawn separately
Linking these together was tricky as I was unsure of the diameter of the upper part. I took a reasonable estimate of the diameter of the central angle, using a profile gauge and with a little give and take and an assumption that the centre angle and bands of decoration would be horizontal (or near to) I joined the drawn profiles to the base drawing. I draw on drafting film which is translucent so I can lay the drawings over each other. Once in position I could draw a final copy pulling the recreation of the whole beaker together.
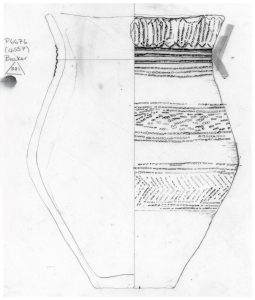
The second draft
The final drawing is a second or third attempt. When I began drawing, I hadn’t seen the sherd showing the lowest band of pattern. I wasn’t happy with the result. But as soon as the lower band was put into place, the beaker drawing took a form and size which looked right at last.
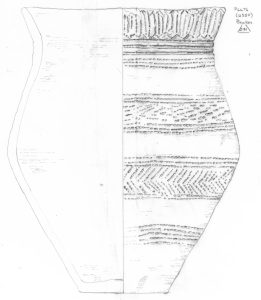
The final drawing


Post a Comment